
To get the worn or aged look you’re looking for, your best bet is to use chalk paint. Choose a quality, mineral-based one. They offer a more natural finish and do not crack, unlike acrylics. Do you know what chalk paint is?
2. Vintage effect: use a brush
For painting vintage furniture, it is best to use a brush instead of a roller in all steps. The bristles of the brush offer a more striking texture and a more vintage result. With the roller you get a more uniform finish. But which brush? With short and hard hair the brush movements are more pronounced and are used for hair removal or for decoration with stencils. Use long, soft pile if you prefer a smoother finish and for larger surfaces.
Color trends for vintage furniture
Painting vintage furniture gray is one of the most common alternatives. Elegant, classy and versatile in all its shades, from the lightest, like the one in the photo, to the most intense. It adapts equally well to both modern and more classic environments. Another option is white in any of its many shades.
How to paint a vintage piece of furniture: the stripping technique
Painting furniture is a constant in decorating to update your home. Not old fashioned. You can use various methods to give it the vintage look you are going for. One of the best known is the pickling technique, which gives a worn and aged appearance. This method simulates the passage of years in the painting. It essentially consists of removing a part of the paint so that the lower layer or, directly, the wood is visible.
 Excellent ideas for choosing the perfect bathroom furniture
Step 1: Prepare the furniture
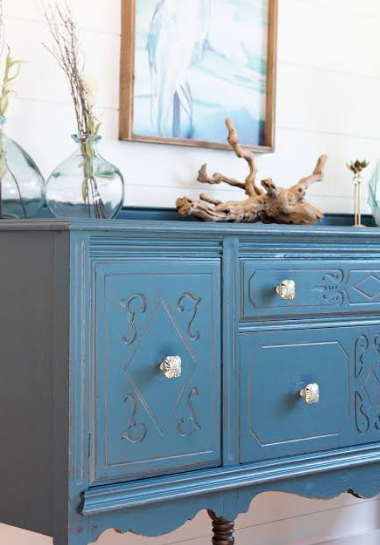
Whether you want to recover an old piece of furniture or give a vintage look to a new one, the first thing to do is prepare the piece of furniture. Remove the handles and accessories and attach what is needed – a leg, a door, etc. -. If it is new, you can use a bridge to make tracks – different from each other – as if they were frame cutouts. It will give you a more accomplished vintage look.
Step 2: Sand the furniture and clean it
If it is painted or varnished, you will need to sand it down to the finish with fine or medium grit sandpaper. Once finished, clean the entire surface well with a dry cloth and brush to remove all dust.
Nordic style boys’ bedroom: 9 examplesStep 3: Choose colors for your vintage furniture
If you want to give your furniture a vintage look, you have several options. Choose one color and let the wood be easily noticeable, or choose two colors (or more), one darker than the other, which would be the first layer. For this type of work it is not necessary to apply a primer, because what we want is for the background to be visible when we remove the paint.
Step 4: Treat the surface before applying paint
If you want a distressed effect on your current melamine furniture, you will need to treat the surface before applying paint. Apply a layer of primer so that the paint does not chip over time, because these types of surfaces are less adherent.
Step 5: Apply paint
Whether you choose to apply one coat of paint – allowing the original wood to show through – or two or three, let the paint dry between coats. If you want a subtle effect, choose two similar shades. If you’re looking for a more striking result, choose two colors with a lot of contrast, like the white and green in the image.
Step 6: Sand the furniture again
This is the most delicate step and with which you will obtain the aging effect. To make it look natural, sand the protrusions of the furniture, such as corners, corners and curves. Do this little by little and with fine sandpaper. Furthermore, apply different pressures, so that the result is not uniform and realistic.
16 wooden pergolas ideal for large and small terracesStep 7: Protect your furniture with wax
For a long-lasting and natural result, it is best to apply a layer of colorless matt varnish or colorless wax paint. If the furniture is used a lot, the first option is more recommended, because it will undergo a lot of running-in. If the piece is more decorative than functional, apply wax. It is very light and leaves a very silky finish.
More vintage furniture painting techniques step by step
Another option to achieve a vintage look on furniture is to apply wax and skip the sanding step. If you apply a single layer of paint on the plaster and then a dark wax, the aged effect is guaranteed. If you choose a dark shade and want a dusty look on your furniture, choose a white wax. You can apply it with a clean, lint-free cloth – cotton ones are perfect – or with a soft bristle brush.
How to apply wax well?
Apply the wax when the paint is dry. Do not overload the cloth or brush to avoid excess wax and spread it on the surface. Wait about 15 minutes for the wax to be absorbed and remove the excess wax with a clean cloth, without wringing too much and with circular movements. If it is a very useful piece, it may be convenient to apply several layers, but without waiting for it to dry.
Use stencils to paint vintage furniture
This technique is known as shaping and is ideal for giving a piece of furniture a more personal and original touch. There are thousands of shapes and designs, from letters to plant motifs. To use them, it’s best to tape them down – so they don’t move while you paint – and use a brush for outline. They have a round tip and are quite flexible. Also, dump some of the paint off the brush before applying it. There are two stencil techniques: with small touches or with circular movements.
If what you want is to give your vintage furniture an original and continuous pattern, use a roller to paint the patterns: they are sold like this. Before applying it to the furniture, do several tests on paper to decide in which direction the decorative motif will go.
¡Síguenos en Facebook para recibir nuevas publicaciones!
Seguir en FacebookLatest Posts Published

10 ways to save when you want to design a garden with a swimming pool

How to grow rose bushes at home

Sunflowers: care, how to plant them and when to water them

3 types of grills suitable for your garden or terrace

How to build a toy box at home

Ideas for furnishing your terrace with wicker furniture

10 Rustic Terraces You’ll Love
How to create beautiful and very simple floral compositions

How to cure brown leaves that appear on avocados?